Framebuilding techniques for metal frames *

OXY-GAS BRAZING & WELDING

FIG.1 Brazing in a hearth at Achielle in Belgium.

FIG.2a A miniset propane-oxygen as often used by plumbers, and a 10 liter professional oxygen-acetylene rig.

FIG.2b Air Liquide Easyflam S03
A DIY-shop soldering torch has a flame temperature of approximately 1500°C, but the amount of heat supplied is very limited. Moreover, as the temperature of the joint increases, the heat leaks away faster and faster. Some types of silver brazes already melt at 600-700°C; but this must also be the temperature of the joint. Brazing a heavy joint such as the bracket is hardly possible with an air-gas torch. It is only possible if the heat is captured in a hearth, like in a blacksmith workshop. We can see that in the photo above. The bracket is fixed (pinned) and is heated in the hearth with a large propane blowtorch to approximately 1000°C. Now the brass is added with a brazing rod; at the Achielle factory, this is still the case (see FIG.1). Usually another torch, or series of torches, is arranged for each joint. The gas consumption is high, but propane is cheap. In general we speak about soldering below 500°C, above that temperature we talk about brazing. Solders often contain a lot of tin (Sn in the charts) , brazes often contain copper (Cu in the charts)
If you want to braze freely without a hearth, you will have to work with an oxygen/gas set. There are disposable sets for brazing. The name says it all: not really suitable. If you do want to try it, do not choose propane as a gas, but use a mixed gas such as MAPP (= propyne/ propadiene). This gives a slightly higher temperature than propane. I don't know if such a torch produces sufficient heat for the required minimum working temperature of 650°C (55% silver solder) for a bracket.
A welding rig works with an oxygen and a gas cylinder. Brazing with an oxy-gas torch has been common practice in frame construction for years. It was the standard work process for a century. You can also use a somewhat cheaper gas such as propane, but the flame temperature is lower. To weld, the gas must be acetylene.
Autogenous welding of frames was still used in France before the war, both for steel and aluminium (Barra).
The combustion rate of acetylene is 2.5x faster than propane and that produces 3x as much heat per second. That is why the professional chooses acetylene: the desired temperature is reached quicker and the oxygen consumption is lower. The acetylene/oxygen mix is 1:1.5. The gas/oxygen mix is 1:4.5. Refillable cylinders are often for sale on a trade-in basis. Pay a "boarding fee" once, and exchange for a full one when the cylinder is empty. The ALBee Easyflam mini sets are very attractive: acetylene/oxygen sets in 3 or 5 litres, see FIG.2b. The protective head of the cylinder also contains the pressure regulators.
I also worked with oxygen-propane. The propane tank is a 10 liter BBQ gastank, I used a 10L oxygen cylinder, and a torch with modified nozzles for propane from Gloor Lilliput .
Americans often work with a medical oxygen concentrator instead of an oxygen bottle. Sometimes they can be purchased second-hand for €500 (more than 5 l/pm yield is desirable).
BRAZING OR SOLDERING ALUMINIUM
TABLE 1

Brazing aluminium has never been fashionable. One of the problems with soldering is the very stubborn oxide layer. By sanding well, just before soldering, oxides are removed; in addition, the solder adheres better to the rough surface. To prevent a new oxide skin from forming during heating, the surface to be soldered is coated with flux. Remove aggressive flux residues afterwards because of the corrosion susceptibility.The first three solders from the table below are not strong enough to build a frame; it is at most something for small brazing parts, but easy to do with a propane torch. There are few readily available brazs for aluminum. One often found, is Silumin, but it melts around 580°C and this is unfortunately close to the melting point of most aluminum alloys. This requires an autogenous welding torch. We don't see the metal getting hot ( the aluminum oxide layer only melts at 2200°C); if we get too close to the metal with the flame, the melt suddenly creeps out.
Technoweld does not require flux and can be processed with a propane flame; the main component (>90%) is zinc. Important with this type of solder is the fact that we do not reach the dissolution temperature for aluminium of 500°C. This eliminates the need to perform a new heat treatment; Artificial aging is recommended, but less difficult. Alutite and Easyweld are comparable, but there are more brazes on the market. A test of Amazon products : https://www.youtube.com/watch?v=fKIKsDfRAcs . Hobart: https://amzn.to/3d1L7s1 Blue Demon: https://amzn.to/2StbCxk Bernzomatic: https://amzn.to/33t2yi4 .
Castolins' variant of the silumin solder is called "190" and is mentioned by tube manufacturer Columbus as the brazing method for their 6061 and 7000 tubing; use the flux 190 NH (NonHygroscopic)! This braze material is also available as a paste (solder + flux), but availability is often the problem.
BRAZING STEEL WITH SILVER OR BRASS
TABLE 2.

.
SILVERBRAZE
Dozens of braze types are on the market, but it is not always easy to find a specific brazing rod. The more silver, the more expensive. An advantage is the low melting temperature, which means that we can sometimes work with a good turbo propane flame. For the other types we have to use an oxygen acetylene or oxygen propane rig. According to European regulations for chemicals (REACH) brazes containing cadmium are banned since 2011. The prices of silver braze (56%) are currently (2021) around €1000 per kilo; brass costs about €35 per kilo. Manufacturers such as J.W. Harris, Johnson Matthey and Thessco supply brazes and fluxes. If you are using Thessco for lugs for example, choose silver braze CS111 (56%) or CS81 (40%). Above is a list with some comparable silver braze types from several suppliers; not everything is for sale everywhere on the globe. In modern brazing applications, a gasflux is sometimes mixed into the flame, (see company SIF) ; the flame turns green. Good ventilation is necessary, but the workpiece remains much cleaner.
To get a good bond between the braze and base metal, the surface must be perfectly clean. First clean with a degreaser and then roughen with fine sandpaper. Residues of oxides are removed; in addition, the solder adheres better to the rough surface. Coat the surfaces to be brazed with flux. In the case of silver braze e.g. Flux-6 (melting point 550°C), and with brass e.g. Boracit (melting point 800°C). Only if the steel is sensitive to high temperatures or if we work with stainless steel, should we choose silver solder; use a special flux for stainless steel, e.g. Activatec 1000.

BRAZING BRASS
Brass brazes have an ideal gap width 0.1 to 0.3 mm; the brass must flow completely through the joint, so there must be a brass edge everywhere on the inside. It is actually easier to work from the inside out. That's why I sometimes apply a paste of flux and solder powder to the inside of the tube. This flows from the inside out when heated. On the outside I still apply brazing material to make the transition as gradual as possible. Not so much for maximum strength, but especially for lower peak stresses due to a smoother flow of forces. Once we have reached the required temperature, we heat the brazing rod with some flux on it, along in the flame before use. The braze flows to the hottest place; so we can steer it with the flame. Make sure that the “hotspot” (just in front of the flame cone of the nozzle) does not touch the braze, because it can decompose! The temperature of the steel can be deduced from its color. Reputable companies for brazes are for example: J.W.Harris (USA), Johnson Matthey (England) and Castolin (Switzerland). .
ELECTRIC WELDING
There are various welding processes, but unfortunately not all of them are suitable for building a quality frame. Welding with covered electrodes (MMA) used to be the most common. The do-it-yourselfer who chooses this should maintain large safety margins, i.e. use a thick-walled pipe (1.5 to 2 mm)! The enormous heat input with this welding method means that we will have to align the frame considerably, because it will undoubtedly warp. This is because the tube expands during welding; after that, when cooling down, the tube will shrink and tensions will arise in the frame. These remain even after aligning. However, the constantly varying loads on the frame can “temper” the frame. It often warps again. Using a simple welding transformer one should use electrodes of 1.5 or 2mm, at a current strength of 20 to 35A. Common mistakes are slag inclusions and bonding errors.
The next process is MIG/MAG welding, also known as CO2 welding. These welding kits have come within the reach of the do-it-yourselfer in recent years. The smallest versions only have gas in their expensive gas bottles for a few minutes. I recommend taking the more common 10 liter bottles. Almost all types of shielding gas are available here and it is much cheaper per liter. MIG/MAG welding can be used with wall thicknesses from 1.2 mm. Several errors are possible, including gas inclusions and binding errors. The main cause of gas entrapment is that the torch is held too slanted (i.e. not perpendicular to the tube). This allows the gas flow to draw in air. During welding, care must be taken that the parent material melts sufficiently. Bonding errors occur if the welding speed is too high! For wall thicknesses from 1.2 to 1.5 mm, a wire speed of 3-5 m/min is usually chosen, with a wire diameter of 0.8 mm and a gas speed of 8 to 10 l/min. A new development is the use of a CuSi3 "welding wire" for MIG welding machines with argon as shielding gas. In fact, this is a soldering connection, which is mainly used for galvanized steel sheet in the car industry and old-timer restoration. The melting temperature is around 1050°C.
The only good welding method for frames is TIG welding; a welding torch is used, in which an electric arc is drawn between a tungsten tip and the workpiece, under a shielding gas such as argon or helium. Like gas welding, material is added with a welding wire. The view on this welding process is good. The heat input is limited and the weld hardly needs any post-processing. It is often necessary to protect the inside of the tube with inert gas during welding. Welded top frames made of steel, stainless steel, aluminium or titanium, are all TIG welded. .
Modern electronic inverter technology has enabled an efficient process to convert the standard 230V - 400V AC into a safe 45V DC voltage for welding. This also makes the welding machine lighter and more compact. General info from Wikipedia about TIG welding: https://nl.wikipedia.org/wiki/TIG-lassen
Inverters easily combine electrode and TIG welding in one machine; these cheap machines are offered from €200. Of course, an extra investment will have to be made for the Argon gas cylinder and the associated pressure regulator; together this is at least €200. The possibilities of these cheap machines are limited. If you want to weld aluminum (AC) in addition to steel (DC), it will cost more. The more expensive the more extras, such as: foot pedal, 2 and 4 four-stroke, downslope, pre and post throttle, AC balance, water cooling, three-phase current and a 300 bar cylinder. Professional machines cost around €2000. In any case, buy a real welding helmet that is suitable for TIG welding, because a lot of UV light is released.
As with any joining method, the quality depends on the craftsmanship of the builder. An alternating current system is required for TIG welding of aluminum; some guidelines for this process:
*steel (electrode negative pole): wall thickness 0.9mm, electrode 1.6mm
welding current 90 A, argon 5 l/min, welding wire 1.5mm
*aluminium (alternating current!): wall thickness 1,5mm, electrode 1,6mm
welding current 115 A, argon 6 l/min, welding wire 1.6mm
There are also types of copper solders for processing with the TIG welding set, referred to in the USA as silicon bronze (with TIG you cannot use solders containing zinc!). A well-known brand name is Everdur Cu95Si4Mn1. In the Netherlands, e.g. ESAB OK TIG-rod 19.30, a comparable product, readily available (halve the current and pole the welding machine if necessary). It can also be used with autogenous and borax flux at 1050°C, but with a torch I prefer brass.
Welding aluminum is not easy. For AA 7000, choose welding wire type 5356, 5180 or 5183. For AA 6000 we need welding wire 4043 or 4145. Special alloys such as Scandium or Zirconium require a special welding wire supplied by the tube manufacturer! We start with degreasing, for example with acetone; then the oxide layer of the pipe must be sanded off with Scotch Brite or stainless steel scouring pads (no sandpaper). Then degrease again. After the last degreasing, the tube must be processed within an hour to prevent the new built up of oxides. The gap between the tubes when welding should be about 0.5mm; more than 0.75mm can already cause problems. The seam must be laid in one go; start and end of the weld must be on the side (neutral line). The welding torch should not be run over the weld a second time to make corrections or to obtain a smoother surface. Directly after welding, while the frame is still warm, any straightening should take place. The tube manufacturers are against smoothing the weld with a file, because the risk of damage is high and the joint does not become stronger; it is recommended to sand with 400 or 600 fine sandpaper.
GLUING
There are two types of glue suitable for building frames: anaerobic synthetic resins and epoxy glues. Anaerobic synthetic resins harden if they are in a thin layer between two metal surfaces and no oxygen can get to it. Well-known names are Locktite and Threebond. At Alan's, where they have done pioneering work, the tubes and lugs are threaded with a fine thread and glued with Locktite 317.
There are two types of epoxy adhesives. First, glue the two components, such as Araldit AW2104. This product is supplied in a double sprayer, in which hardener and resin mix during spraying. It hardens already at room temperature. In the oven, however, this happens faster and the quality of the connection improves. The shear strength of Araldit AW106 cured at 23°C is 17N/mm²; at 100°C: 27N/mm². Furthermore, the curing time is shorter: at 23°C 12 hours, at 100°C 10 minutes! A second type of epoxy is the one-component adhesive; in fact, the hardener is already mixed with the resin here, but it only becomes active at higher temperatures (keep in the fridge!). Adhesives of this type, such as Araldit 118 and 119, are very suitable for metal-metal connections. With a curing time of 1 hour at 150°C, a shear strength of 30 N/mm² is achieved. Because the shear strength of glue is much lower than that of solder, the bonding surface will have to be many times larger. The development of exotic frame materials makes a choice for bonding attractive, because virtually any material can be bonded. To get a good connection, the metal must first be degreased. The seam to be glued is then roughened on both sides with fine sandpaper and hung in a pickling bath. After pickling and drying, gluing should be started as soon as possible to prevent new oxidation. Degrease, roughen and degrease reinforced plastics before gluing.
The ideal adhesive layer is about 0.1 mm for metals and about 0.4 mm for plastics. For an optimal result, the glue should cure in an oven. Do not begin such a job until you can perform the required operations. If in doubt, consult the supplier VIBA Zoetermeer. The connection between aluminum and carbon in particular can cause problems (corrosion due to galvanic action). The pickling baths that are used differ per metal type; the glue supplier can supply them ready-made. Here's a recipe for steel: degrease and sand first. We now make a pickling bath by adding 1 liter of hydrochloric acid (35%) to 1 liter of demineralised water. We keep the bath at a temperature of 25°C, and we etch for 3 to 10 minutes (depending on tube thickness). Rinse with demineralised water and dry well at 65°C for 10 minutes; glue immediately.

FIG. 3a Bad FIG. 3b Good FIG.3c Better
The transition from lug to tube has a major impact on ultimate strength and resistance to varying loads. The shape of the glued seam is very important; the shear strength of the glue joint in FIG. 2 is 3X higher than that of FIG. 1; that of FIG.3 is slightly better. The shear strength of a good adhesive is 30 N/mm²; that of good solder is 500 N/mm²: a glue joint must therefore have a much larger surface! For good wetting, both parts to be glued must be covered with glue.
The correct overlap of a glued seam for a 30 mm tube is ± 45 mm. The joint should be the strongest spot; the stronger the tube, the greater the adhesive surface.
If the forces are relatively low, you can opt for an anaerobic methacrylate such as Loctite 661. Because the steerer tubes are not readily available, I now use a standard 25.4x2mm tube without thread (for Aheadset). After soldering I glue an 80mm long 22x1mm tube as reinforcement in the bottom of the fork crown.
RIVETTING
This is a simple way of connecting, for which the investment in tools is small. The drill, some glue clamps, rivet pliers, a square, a center point and a measuring tape are the desired tools. Most of it is already in the toolbox. Building a design with this connection method requires a completely different approach. The choice of materials is in principle free, but in practice it is almost always aluminum sheet, here and there reinforced with profiles.
The photo on the right shows a joint of a Moulton folding bicycle; here two steel tubes are rivetted to each other. The steel of the top tube is pressed to fit, and connected with steel rivets and then brazed all around.
FIG.4

.
Usually however, aluminum sheets (Al Mg3) and pop rivets are used. Although the technique is simple and requires little training, careful work is a must! A good rivet connection must meet one condition to contribute effectively to the strength of a frame: it must clamp the sheets firmly together. The strength comes from the friction between the sheets. If there is play between the joined plates e.g. due to burr formation when drilling, there is a chance that the connection will “work”. Due to varying loads on the frame, the pop rivet will stretch the holes in the sheet. The frame squeaks and creaks as the sheets slide and cracks can occur in the sheets. Make sure that the two sheets are clamped firmly together when drilling, so that no burrs can form between the sheets. Remove any burr on the back by “turning off” the burr by hand with a drill bit of a few mm larger diameter. This can also cause play in the connection. Unfortunately, this is not possible in the final phase of construction, because we can no longer reach anything; so choose more connections than strictly necessary. This results in a lower load per connection and therefore less chance of problems. It is possible to pre-drill one of the sheets to be popped completely. Do not do this with both plates, because the sheet settles during popping and the holes can shift relative to each other. Try to pop in from the outside as much as possible, because this way the flat side of the pop rivet comes up; more beautiful and dirt-resistant. Take 3 and/or 5mm pop rivets; rather many small nails than a few large nails. If you are working with a simple hand-held device, larger than 5 mm is not recommended; it takes too much force to process. With a (pneumatic) device it is clearly better and easier; in addition, you can better hold the sheet, so that less distortion occurs.
TOOLS FOR BUILDING, INSPECTING AND ALIGNING

FIG.5a Hydra , a vertical multi-adjustable frame mold for assembling the tubes into a manageable shape before brazing or welding. See: https://www.bikemachinery.it/
Complete production lines: https://www.marchettispa.com/machinery/assembly-line-solutions/

FIG.5b Steel VAR alignment table.
Many frames built with lugs and tubes are put together in a frame mold like the Hydra. The lugs are then fixed with pins or spot welding (or spot soldering) for the actual soldering.
See the GCN video: How a Colnago Steel Frame is made....
One can align almost all steel frames; only the Reynolds 753 tube had been bred to the point where this pleasant property was lost. There is loss of quality after aligning; avoid doing this multiple times. Aluminum frames can only be aligned immediately after welding when they are still hot. If the bike with an aluminium frame crashes, there is no manufacturer that guarantees that the damage of can be repaired safely; steel frames can often be aligned or repaired. You can't align carbon frames, not even new ones. They have to be perfectly straight coming out of the mold.

FIG.5c VAR dropout adjusters
The dropout adjuster can be used to align the dropouts in the front and rear forks. The installation width of the hub can also be adjusted using these adjusters. On the right in FIG.5c we also see a control device for the front fork. This allows us to check whether the fork legs are centered up/down and left/right. Avoid bending back and forth, which leads to weakening.
In FIG.6a /6b we see two modern products from VAR, With the alignement tool from FIG.6a you check whether the movement of the derailleur is parallel to the plane through the wheel; in fact you use the rim as a reference. Sometimes the mechanic deviates from that line and bends it slightly inwards (toe-in); this would improve shifting, it seems.
The frame plane runs through the center of the head tube and seat tube. If the feeler gauge of the frame ruler from FIG.6b is adjusted to the left dropout, when measuring on the right the tip should also end up on the right dropout. If not, we have to pay close attention to which which way it should go, and what the consequence is for the width of the rear axle. The dropout adjusters from FIG.5c come in handy. A wooden bar can be used as leverage. Discbrake developments have also led to special tools to align and mill those things perfectly. This improves performance and reduces wear on pads and discs, see Cyclus tools FIG.6c.

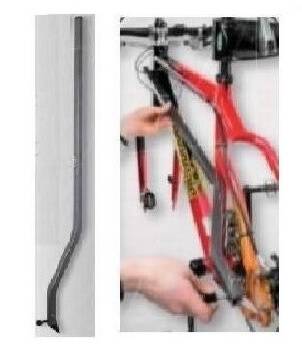
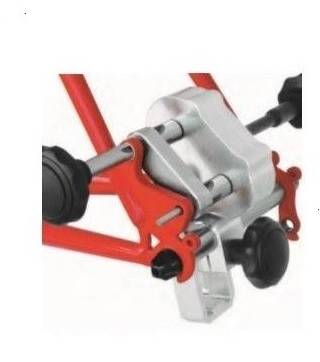
FIG.6a
FIG.6b
FIG.6c
Information about BrazeTec http://www.technicalmaterials.umicore.com/de ; and Thessco: http://www.thessco.nl
Castolin: www.castolin.com, and J.W.Harris (USA) www.jwharris.com ; and Johnson Matthey (Engeland) www.jm-metaljoining.com
About welding: https://www.weldingtipsandtricks.com/
3D printing of metals: https://www.youtube.com/watch?v=fzBRYsiyxjI
3D printing is expensive: https://www.youtube.com/watch?v=fzBRYsiyxjI
Bike with 3D printed titanium lugs and carbon tubing. https://www.youtube.com/watch?v=pffBDV_sUsI
A 3D printed record bike for Ganna: https://www.youtube.com/watch?v=CXQhsXWtGSQ
Aluminium welding: https://www.youtube.com/watch?v=LEQCSbxZoeA and titanium: https://www.youtube.com/watch?v=TLbC5Qlpjgw
.